
I’ve been building for the web for 15 years. HTML, CSS, a bit of JavaScript. This is my attempt to find out how far AI can take me into territory I’ve never been able to reach on my own.
A bit of context
I should be upfront about where I’m coming from, because it’s relevant to everything that follows.
I’ve spent 15 years working on the web, mostly as a designer who codes. I’m comfortable and confident with HTML and CSS. I know my way around vanilla JavaScript. But frameworks like React, server-side logic, databases, authentication flows — that world has always been just out of reach. Not completely foreign, but the kind of thing where I’d get going, hit a wall I didn’t understand, and end up putting the project down.
AI-assisted coding has changed that equation for me. Not by making me a better engineer overnight, but by giving me a collaborator who can hold the complexity I can’t. I can describe what I want to happen. I understand the output well enough to reason about it, catch mistakes, and ask good questions. That turns out to be enough to build real things.
Appply is my experiment in testing that theory.
What Is Appply?
I’ve been job hunting and, like most people, I started with a spreadsheet. A column for company, a column for role, a dropdown for status. It works until it doesn’t — until you have 40 applications in flight and no idea when you last heard from anyone, until you realise you’ve sent the same generic cover letter to every role, until the whole thing becomes a source of anxiety rather than a tool for managing it.
Appply is a personal job application tracker that replaces the spreadsheet with something purpose-built.
Two things make it different from the trackers that already exist:
1. Status as a timeline. Every status change is timestamped and kept. The full history of every application is always visible. The status model reflects how job searches actually work, with sub-statuses like “Ghosted”, “Job Rec Removed/Deactivated”, “Rescinded Application (Self)”, and “Sent Follow Up Email” sit within proper parent stages (Applied → Screening → Interview → Offer). A simple applied/rejected dropdown loses all of that nuance.
2. Cover letters that actually earn their output. The AI doesn’t just fill in a template. It reads the job description, spots where your saved CV doesn’t directly evidence what the role asks for, and asks you targeted questions before it starts writing, like: “This role asks for X; can you give a specific example from your experience?” The result is a structured, editable draft built from your real experience, not generic AI prose. A 30-minute manual process becomes a guided 5-minute flow.
The design principle behind both features: calm over busy. Fewer steps. Immediately obvious UI. No learning curve.
The tech (and why I’m not going to over-explain it)
Here’s what Appply is built on:
| Layer | Technology |
|---|---|
| Framework | Next.js 15 |
| Deployment | Cloudflare Workers |
| Database | Cloudflare D1 (SQLite) |
| AI | Cloudflare Workers AI |
| Auth | Clerk |
| Payments | Stripe |
| UI components | Shadcn UI + Tailwind CSS |
I’m not going to pretend I chose every one of these from a position of deep expertise. Some I picked because they came recommended. Some came bundled in a starter kit I found. The AI helped me understand the tradeoffs. What I can say is that the whole thing runs on Cloudflare’s infrastructure — the database, the AI, the server, which keeps it simple and cheap to run.
The BMad Framework
Before writing any code, I used a planning framework called BMad to think through what I was building and how.
BMad is a set of structured AI-assisted workflows for product planning. The idea is that instead of jumping straight into building and figuring it out as you go, you invest a few hours upfront producing documents: a product brief, a requirements document, an architecture plan. Together they give the AI (and you) a clear, consistent picture of what you’re making.
For someone like me, this was genuinely valuable. I’m good at thinking about products. I know what good UX looks like. But the moment I try to turn that into technical decisions, which database, how data flows, what happens when a user does X, I get lost. Having a structured process to walk through those questions, with AI helping me understand the implications, made me feel like I actually knew what I was building before I started building it.
The workflow I ran:
- Product Brief → What is this, who is it for, why is it different?
- PRD (Product Requirements Document) → What exactly does it need to do?
- Project Context → Rules and conventions every AI agent working on the code must follow
- Architecture → How it’s all wired together under the hood
Let me walk through each.
Step 1: Product Brief
The brief is the starting point: a short document that captures the product concept, the problem it solves, what makes it different, and who it’s for.
For Appply this was the easy part. I’d been living the problem. The brief crystallised the two things that mattered most (the status timeline and the evidence-driven cover letters), who the product is for (people actively job hunting), and where I’d find them first (my own network, then LinkedIn, then job seeker communities).
BMad also generates a compressed version of the brief for feeding to AI agents later, so they don’t lose context every time you start a new conversation.
Step 2: PRD
The PRD is where you get specific about what the product actually does. BMad walks you through it step by step: who uses it, what journeys they go on, what the app needs to do, and what it needs to not do badly (performance, security, privacy).
The output for Appply was 41 specific things the product must do, and 18 constraints around how it must do them.
Some of the “must do” things are obvious: add an application, update its status, view a history. Others came out of the process that I might not have written down on my own: that every status change needs a timestamp, that the AI can never mix up one user’s data with another’s, that deleting your account must delete everything.
The constraints are the ones that end up mattering most to the technical decisions later. Things like: status changes should feel instant even if the server hasn’t responded yet (which turns out to require a specific pattern in the code). Or: the AI cover letter must finish generating within 30 seconds or the infrastructure will time out.
These details are exactly the kind of thing I would have discovered halfway through building and had to awkwardly retrofit.
Step 3: Picking a Starting Point
Rather than building from zero, I found a solid starter kit: ixartz/Next-js-Boilerplate.
For a solo build, starting kits like this are a huge deal. It comes pre-wired with login, payments, internationalisation, UI components, and testing: all the infrastructure that would otherwise take weeks to set up. I could start with something that already works and build on top of it.
I did have to swap out the database layer. The starter came with a different database setup, and I wanted to use Cloudflare’s own database (D1) to keep everything on one platform. The AI handled the migration: I described what I wanted and it made the changes, explaining what it was doing along the way.
I made one mistake early on: I started with an older Cloudflare integration method that turned out to be the wrong one. The correct approach is the newer @opennextjs/cloudflare adapter. This cost me some time until the AI pointed me to the right documentation.
Step 4: Project Context, the rules document
This is one of the most useful things in the BMad process and also the least glamorous.
The project context is a document that records everything an AI agent needs to know before touching any code: the file structure, the naming conventions, which patterns are used for what, and, critically, a list of “never do this” rules.
A few examples from Appply’s rules. Never fetch data from the database inside a component that runs in the browser, only do it server-side. Every database query must be tied to the current user’s ID, no exceptions. Text can never be written directly in the code, it has to go through the translations file first so internationalisation works. And the project uses a specific utility helper that is different from the default, always use that one.
Without this document, AI agents working on different features in different sessions start making slightly different assumptions. The code still works, but it quietly diverges in ways that become messy. The rules document prevents that.
Step 5: Architecture
The architecture step is where the AI helped me most, because it’s the part I understand least.
The BMad architecture workflow is a collaborative eight-step process. At each step, it asks questions, surfaces tradeoffs, and explains why certain decisions matter. By the end I had a proper document covering how data moves between the browser and the database, how authentication works and where it is enforced, how state is managed when the table view and the Kanban board show the same data, how the AI cover letter generation works without timing out, where the freemium limits get enforced, and what happens to everything when someone deletes their account.
The key insight I took from this step: the AI can write correct code, but it needs to know the rules of this specific project to write correct code for this project. The architecture document is where those rules live. Every agent that works on the codebase from this point on reads it first.
What the planning phase produced
By the end of the planning session, Appply had a product brief, a full requirements document (41 features, 18 constraints), a project context and rules file, and a complete architecture document.
No code yet. But a very clear picture of what the code needs to do, how it needs to be structured, and what every AI agent working on it must follow.
The next phase is breaking the requirements into epics and stories, then implementing them one by one — each story executed by an AI agent working from these documents.
5 May 2026 — The First Real Build Day
Today I ran two full epics from backlog to done. Seven stories. The whole core tracker — working, tested, and reviewed.
I want to be honest about what that felt like, because it’s the part this experiment is really about.
What I actually did vs what the AI did
I didn’t write most of the code. The AI did. I described what each feature needed to do in plain language, reviewed the output, caught things that looked wrong, and made decisions when the AI presented options. I ran the tests, read the results, pushed back when the review found bugs, and made sure they got fixed.
That’s not nothing. But it’s also not traditional coding. It’s closer to directing than writing, and coming from a design background, that’s a frame that actually makes sense to me.
What shipped
The database and wiring (Story 1-1)
The invisible foundation: setting up the database tables, the shared data types, and the plumbing that connects the browser to the database. Nothing to look at, but everything else depends on it.
The app shell (Story 1-2)
The signed-in layout: the sidebar navigation, the page structure, the responsive behaviour. This is the kind of work I could have done myself in HTML and CSS, but here it’s tangled up with authentication logic and routing rules that I’d have struggled with alone. The AI handled it cleanly.
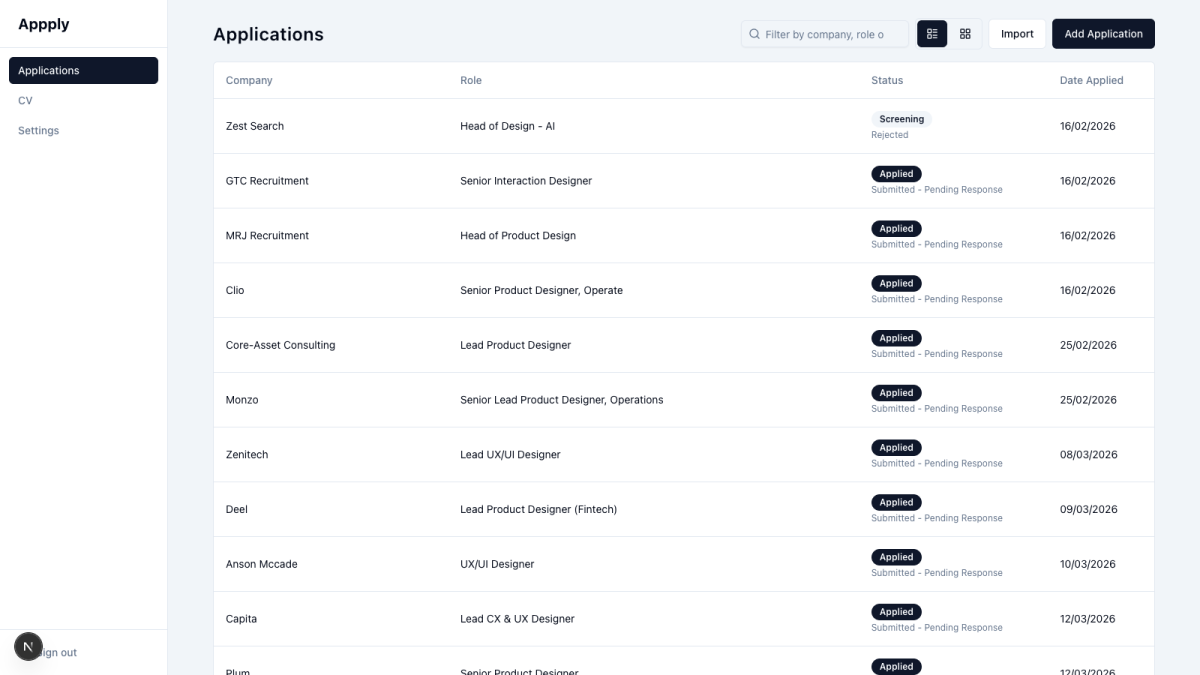
Adding and viewing applications (Story 2-1)
The first thing that actually felt like a product. A form to add an application (company, role, date). A table that lists them. A small “add” button. Clicking a row opens a detail panel. Simple. But getting it right required the data fetching, the form handling, and the table rendering to all work together, which is exactly where my React knowledge starts to thin out.
Status history (Story 2-2)
This is the feature that makes Appply different from a spreadsheet. Every status change — “Applied”, “Screening”, “Interview”, “Offer”, “Closed” — is timestamped and added to a permanent history log. The detail panel shows the full timeline. When you update a status, the change appears instantly in the UI before the server has even responded, then quietly confirms (or rolls back if something went wrong). That instant response, the UI not waiting for the server, was something I’d seen described but never understood how to build. I understand it a bit better now.
Notes and delete (Story 2-3)
Notes live in the detail panel. You type, click away, and they save automatically. A small indicator tells you when it’s saving and when it’s saved. Delete lives in a right-click menu with a confirmation step to prevent accidents. Nothing technically dramatic, but the details matter: the auto-save timing, the save indicator states, the confirmation copy.
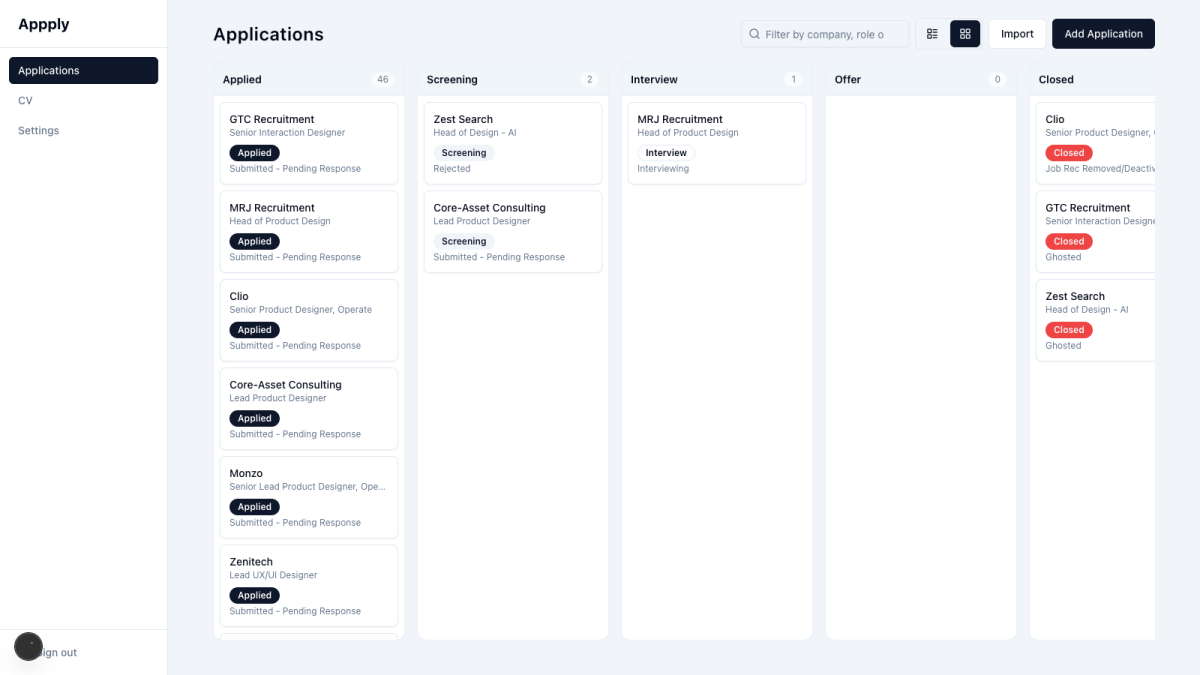
Kanban board (Story 2-4)
Drag and drop is one of those interactions that looks simple and is genuinely complicated under the hood. Five columns, one per pipeline stage. Cards you can drag between columns. Dropping a card fires the same status update as clicking in the table, so both views always show the same data. The ghost card that appears under your cursor while dragging. None of that would have been achievable for me without the AI.
View toggle and filter (Story 2-5)
The story that connected everything. A toggle between table view and board view, with your preference remembered between sessions. A search bar that filters by company, role, or status as you type — no waiting, no server call, just instant filtering of what’s already loaded. Both views handle the “nothing matches” state with a helpful message and a clear button.
The review process — where things got interesting
After each story, I ran something called a code review, a BMad workflow that reads the changes and looks for problems. It sends the code through three different “reviewers” simultaneously, each looking for different things: bugs, edge cases, and whether the feature actually does what it was supposed to do.
On Story 2-5 alone, the review found six real problems. If the data failed to load while in board view, the page showed nothing, no error, no message, just blank columns. The fix was a single line, but without the review I’d never have caught it because the happy path worked fine. If you typed a filter and got no results in board view, you’d see five empty Kanban columns with no explanation; the table view handled this correctly, the board view didn’t. The “no results” message in the table could appear before the data had even finished loading, so you’d type something, see “no applications match”, and then a moment later your applications would appear. The preference for table vs board view was being saved in a way that could crash in certain browsers’ private mode. The toggle buttons were announcing themselves twice to screen readers, once from a tooltip and once from a hidden label. And a missing attribute on some buttons meant they’d accidentally submit any form they were placed inside, not a problem now, but the kind of thing that causes a confusing bug later.
All six were fixed. None of them would have made the product unusable, but two of them were real UX failures that real users would have hit. The review caught them before anyone else did.
This is the part of the experiment I find most interesting. The AI writes code faster than I ever could. But it also misses things, not through carelessness, just because it’s generating based on the brief it was given, not living in the product as a user. The review pass is the layer that catches the gap between “works in the happy path” and “works for real people”.
6 May 2026 — The Afternoon I Lost to a Markdown Editor
Extended application fields (Story 2-6)
The last story of the sprint added the fields that make the tracker actually useful for research: job URL, source (LinkedIn, referral, careers site…), salary, and contract type. These live in a new “About this role” section in the application detail panel. The modal also became two-pane at this point: the main detail on the left, a persistent activity feed on the right. It now looks like something you’d actually want to open.
I had modest ambitions for today. One small quality-of-life improvement: make the Notes and Job Description fields in the application detail properly support rich text, rather than just storing plain text.
Four hours later I was still at it.
What I wanted
A text editor with a formatting toolbar. Bold, italic, headings, lists, links. Nothing exotic, the kind of thing you’d find in any notes app. The fields already saved and loaded text correctly. I just wanted to add formatting on top.
Version 1: react-markdown
My first approach was simple: keep the textarea as-is, add a toolbar that inserts markdown syntax around selected text (wrapping ** around a selection to make it bold, for example), and add a preview toggle to show the rendered result.
This worked. It even worked nicely. The toolbar icons, the preview pane, the way the cursor stayed in the right place after you applied formatting — it all came together cleanly.
Then I spent a while polishing it. The preview toggle became a single eye icon that highlights when active. The toolbar buttons became proper icon buttons using lucide-react. A genuine glitch in the scroll position after formatting got fixed. Each thing was straightforward once you know what you’re doing. I didn’t.
Version 2: Lexical
By mid-afternoon, I decided the textarea-plus-preview approach felt clunky. You shouldn’t have to toggle between an edit view full of symbols and a preview pane to read what you wrote. A proper WYSIWYG editor, where you see formatted text as you type with no preview needed, would be significantly better to use.
So I pulled in Lexical, Meta’s open-source rich text editor framework. The concept is good: define the nodes and transformers you need, plug in the plugins for the behaviours you want (history, lists, links, markdown shortcuts), and you get a fully functional rich-text editing surface with relatively little custom code.
What made it take all afternoon was the gap between “relatively little” and “a few subtle things that need to be exactly right”. Keeping the external state in sync with the editor required a custom plugin to handle the bridge without causing infinite update loops, because the parent component passes a markdown string down while Lexical has its own internal state. The toolbar buttons had to use onMouseDown rather than onClick to avoid stealing focus, but that breaks keyboard navigation, so onClick still needed to be there for keyboard users. The heading button would silently erase all the text in the current line unless you passed true to transfer children when replacing the node. And URL input via window.prompt leaves a security gap because users could technically enter javascript: URLs, so that needed a filter too.
Each of these was a small thing. None of them was obvious from the documentation. All of them showed up in the adversarial code review that runs after every change — which meant fixing them, re-running the review, and checking that the fixes hadn’t introduced something else.
The final result works well. It’s a genuinely pleasant editor: you type markdown shortcuts (**bold**, # Heading, - list item) and they render live as formatted text; the toolbar gives you the mouse-friendly version of the same; undo/redo works; the existing markdown stored in the database loads and saves correctly without a schema change.
But if you’re reading this wondering why experienced developers laugh when someone says “it’ll only take an afternoon” — this is why. Every problem is small. There are just more of them than you expect.
Where things stand
The core tracker works. Add applications, update their status with a full history, add notes, view as a table or a Kanban board, filter by anything, drag cards between columns. Two epics done.
7-8 May 2026 — Smarter Inputs and a Layout That Finally Behaves
Two days, four things shipped. I’ll take that.
The job description field — a small thing that matters a lot
Before anything else I surfaced a gap I’d been ignoring. The Notes field in the application detail modal had become a proper markdown editor. The job description field, which gets populated when you first add an application, was still completely invisible once the form was submitted. You could paste a full job posting when creating a role, then open the detail panel and find nothing there. The field just didn’t appear.
This matters because the AI cover letter generator (coming in the next epic) reads the job description to figure out what the role actually needs. If users can’t see or edit that text after creation, the whole thing falls apart before it starts.
The fix followed the same pattern as the notes field exactly: a draft state, a save button that only appears when there’s a change, auto-trimming on save, an optimistic update so the UI doesn’t wait for the server. Thirty minutes of work. One of those cases where “obvious in hindsight” is the accurate description.
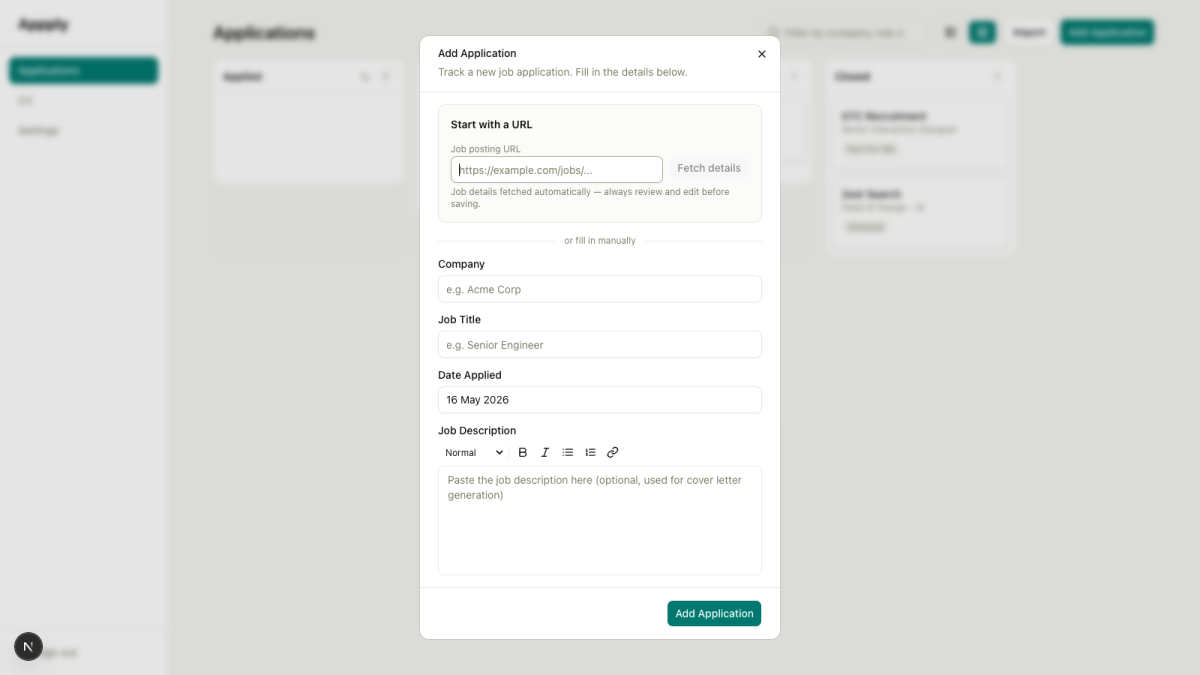
Story 2-7: Paste a URL, skip the typing
This is the kind of feature that sounds gimmicky until you actually use it.
Adding an application manually means opening the form, typing the company name, copying the role title from a separate tab, pasting the job description from the listing. It’s not hard. It’s just friction. Forty applications in, it adds up.
Story 2-7 adds a URL field to the top of the Add Application form. Paste the job posting URL, click “Fetch details”, and the system does the rest. It fetches the page, reads the Open Graph metadata that most modern job sites publish: og:site_name gives you the company, og:title gives you the role, and populates the form fields before you’ve finished reading the page.
When the Open Graph data isn’t enough, the system falls back to Workers AI. It strips the HTML from the page, feeds the text to the AI, and asks it to extract company, role, and job description. The AI handles it well for most major job sites. For anything behind a login wall or aggressively bot-blocked, there’s a clear inline error and the form stays open for manual entry.
A few things had to be right for this to feel good rather than flaky. Error states needed to preserve anything the user had already typed. The “Fetch details” button needed to disable while the request was in flight. The extracted fields needed to remain editable after population, not locked in. All of it came back from the code review clean on the first pass, which doesn’t happen often.

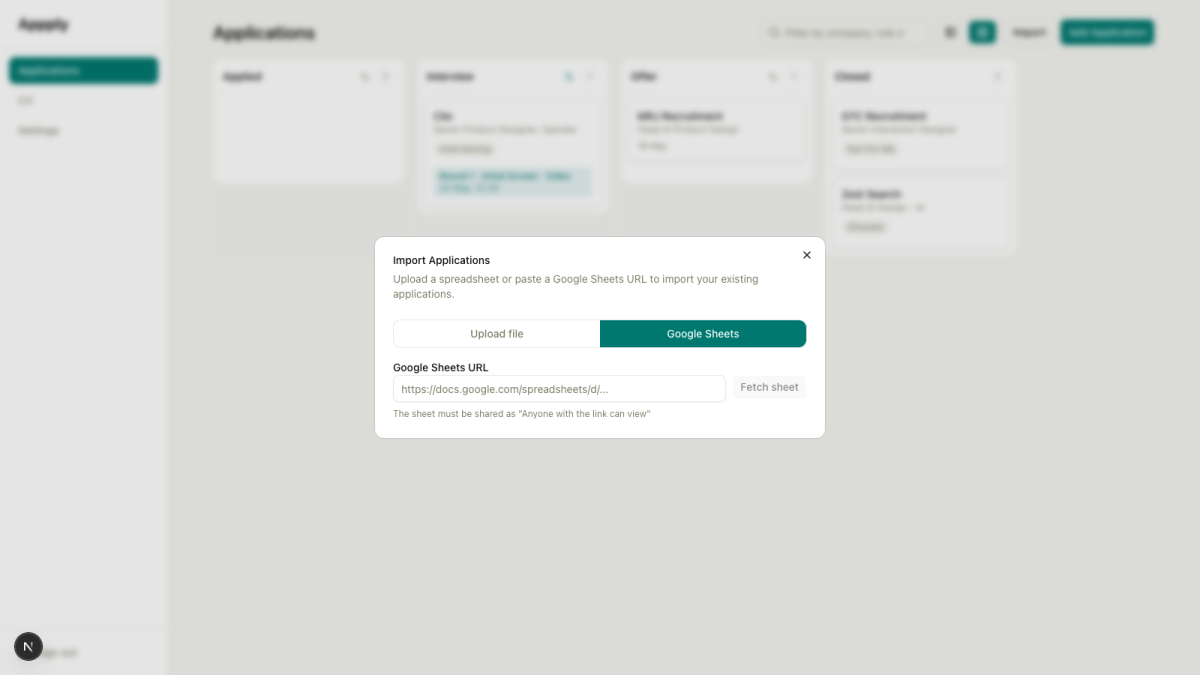
Story 2-8: Import your spreadsheet and leave it behind
The tracker is only useful if your existing data is in it. Most people who’ve been job hunting for more than a week have a spreadsheet somewhere with 20, 30, 40 rows of applications in various states of decay. The ask is reasonable: let me bring that in without retyping it all.
Story 2-8 adds an import flow. A button in the dashboard header opens a multi-step dialog. You either upload a CSV or XLS file, or paste a Google Sheets share URL. The file is parsed in the browser (no uploading raw spreadsheet data to a server), the columns are mapped to application fields, and a preview table shows you exactly what’s about to be imported before you confirm.
The column mapping step handles the messy reality of real spreadsheets. “Company” might be labelled “Employer” or “Organisation”. “Role” might be “Job Title” or “Position”. When the system can’t match headers automatically, it shows a mapping interface that lets you assign columns to the right fields. Unmapped columns are silently dropped.
There’s one freemium consideration baked in. The first bulk import is free regardless of how many rows it contains. After that, imports count against the 25-application free-tier limit. The preview step shows a warning before you confirm if the import would push you over.
I didn’t write any of the file parsing logic. SheetJS, an open-source library, handles CSV, XLS, and XLSX in one package. The AI chose it, explained why it was the right call (client-side parsing avoids sending spreadsheet data to the edge), and wired it in. I reviewed the output and asked it to confirm the freemium logic was behaving correctly at the boundary conditions. It was.
The layout that should have scrolled properly from day one
Something I hadn’t quite noticed, or had been quietly ignoring, was that the dashboard scroll behaviour was broken in a few ways that only become obvious with real content in it.
The sidebar scrolled with the page instead of staying fixed. The main content area would grow beyond the viewport rather than scrolling independently. Kanban columns would keep growing downward however many cards you added, rather than capping at a sensible height and letting you scroll within the column.
None of this was catastrophic. But using a tracker with 40 applications in it is different from testing it with five. With real volume, the layout fell apart.
The fix is entirely CSS. Converting the dashboard shell to a fixed-height container pins the sidebar in place. Adding independent overflow scrolling to the main area gives it its own scroll track. Each kanban column gets a maximum height derived from the viewport, with its cards container scrolling internally. Drag-and-drop still works because the DndContext wrapper was left completely alone.
The review caught one thing: a class had been placed in a location that would have broken the drag overlay. Caught before it shipped, removed, verified. This is the rhythm now: build it, review it, find the thing you missed, fix it.
8-9 May 2026 — Scroll Breaks Drag, Then Time Gets Added
The layout changes from the previous day worked. Sidebar stays fixed, columns scroll correctly, viewport behaves. But the fix broke something else.
Adding overflow-y-auto to the main content area and the kanban card containers put new scroll ancestors into dnd-kit’s detection chain. Dnd-kit caches the position of droppable areas when a drag starts. With nested scroll containers now in the hierarchy, those cached positions became stale mid-drag. The result: dropping a card would target the wrong column, and the column highlight would vanish partway through the drag.
Three things fixed it together. The scroll container was moved from the inner cards div to the outer column div, which is the element dnd-kit actually tracks as droppable. autoScroll={false} on the DndContext prevents any ancestor scrolling during a drag. MeasuringStrategy.Always forces continuous re-measurement of droppable rects rather than relying on a stale initial read. As a side-effect, the column header became sticky when scrolling within a column, which turned out to be worth keeping.
Two smaller changes landed on the 9th.
Screening calls and interview rounds now capture a time alongside the date. “14 May” on its own is not useful when you’re trying to manage a calendar. The format extends from YYYY-MM-DD to YYYY-MM-DDTHH:MM when a time is set; date-only values remain valid so existing data is unaffected. Offer dates stay date-only.
Each Kanban column now has a sort toggle in its header. Default order is newest-added-first. Toggle it and the column re-orders by the relevant event date: Applied shows newest applied date first; Screening, Interview, and Offer sort event date ascending with nulls at the bottom. Columns are independent. Everything happens client-side.
9-10 May 2026 — A Proper Application Timeline
Stories 2-9 and 2-10. The most structurally significant additions since the Kanban board itself.
Story 2-9: Event dates as a separate concern
The status history already recorded when you logged a status change. That is not the same as when the thing actually happened. You might log a screening call on Monday when you book it. The call is on Thursday. A tracker that conflates those two timestamps is quietly unreliable.
Two new columns on the applications table: screening_date and offer_date. A new interview_rounds table for structured multi-round tracking, with rounds numbered in order and each round able to hold a date, a type, and a format. All of this exists independently of the status history.
Three integration points. The database, needing a migration. The Kanban cards, which now show a contextual date relevant to their column: applied date in Applied, screening date in Screening, latest interview round date in Interview, offer date in Offer. A future-dated event shows as an “Upcoming” pill on the card. And a drag-triggered modal: dropping a card into Screening, Interview, or Offer opens a short dialog asking for the event date before confirming the status change. Skipping is always available.
Story 2-10: What kind of interview, exactly?
Each interview round can now be tagged with a type and a format.
Types: Phone Screen, Technical Interview, Behavioural, System Design, Case Study, Take-Home Assignment, Panel Interview, Culture Fit/HR, Other. Formats: Video Call, Phone Call, In-Person, Async Video, Other.
Both optional. Existing rounds display without them. Set either and they appear inline: “Round 2 · Technical Interview · Video Call: 16 May”. Knowing the format of the next round changes what you spend the night before preparing. That is the entire justification.
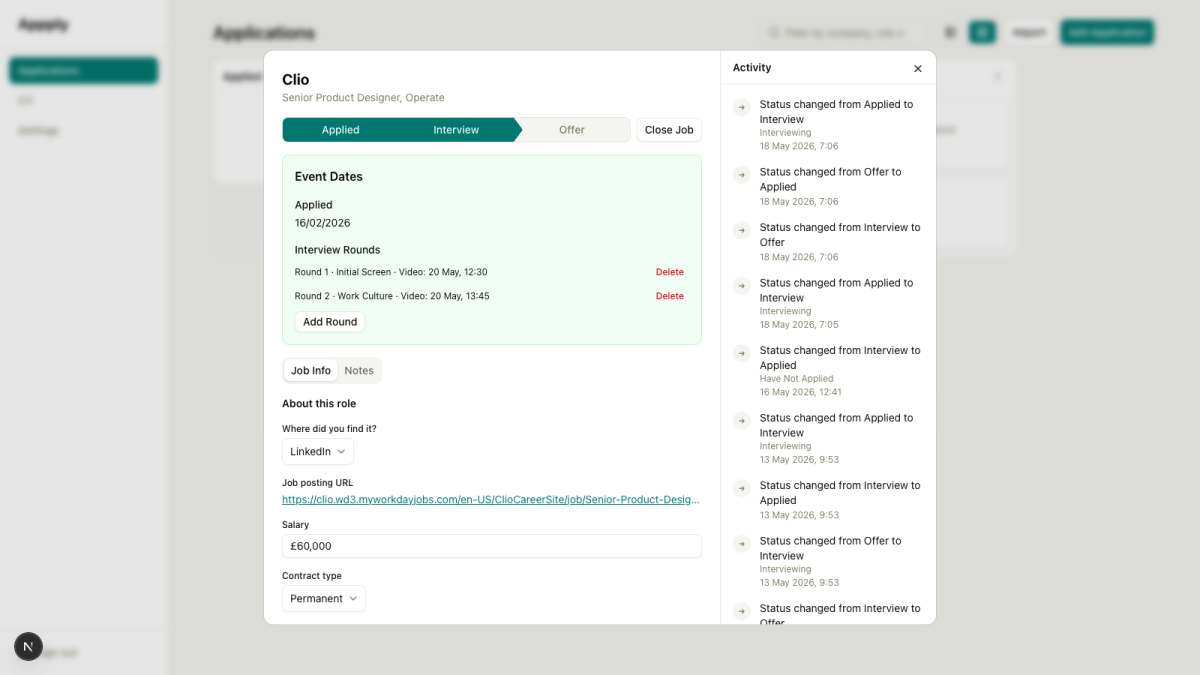
11 May 2026 — The Detail Modal Gets a Proper Rethink
Four separate pieces of work, all touching the application detail screen, all shipping the same day. The biggest single day of the build so far.
Tabs, stepper, close job
The original modal was a long unbroken scroll. Status badge, a change-status button that opened a multi-step dialog, event dates, notes, job description, activity sidebar on the right. It worked. It wasn’t something you’d open by choice.
Three structural changes came in together. The left panel now has tabs: Job Info (role details, salary, contract type, source URL, job description) and Notes (the markdown editor, uncluttered). The status change flow became an inline stepper: four pill-shaped buttons in a row, Applied → Screening → Interview → Offer, with the current stage highlighted. Clicking a different stage fires the event date modal if relevant, then updates the status. No sub-dialog, no dropdown to hunt through. And a “Close Job” button with a dropdown: I Withdrew, Not Selected, No Response, Archived. Rejection choices open a feedback step before confirming.
The old StatusChangeDialog component was deleted entirely. Removing code that no longer needs to exist is one of the better moments in building incrementally.
Closed state and reopening
Once a job is closed, the detail screen now says so clearly. A banner in the modal header. The stepper and close menu both disabled. A “Reopen” button that resets the status to Applied, letting the user re-drive through the pipeline if the role comes back around.
The previous version offered no indication of closure and no simple way to reverse it. An accidentally closed application was quiet and easy to create.
Event dates polish
The Event Dates section received a light green card wrapper and slightly larger typography, giving it visual weight appropriate to what it actually contains. More practically: a logic fix removed the Interview Rounds sub-section from the Applied stage. Interview rounds appearing before any interviews have been scheduled was noise. They now appear only once the application has moved past Applied.
A stale-state bug was caught in review: editing a round, then having the status change from elsewhere, would leave the editing state active even though the round data had refreshed. A cleanup effect resets editing state on status change.
Activity feed
The right panel previously showed status changes. It now shows everything: status changes, interview rounds added, notes saved, job info updated. One chronological feed, newest first.
This required a new activity_log table to persist note-saved and job-info-updated events. Interview rounds already had a created_at timestamp, so they join in directly. The query driving the feed is a UNION across three sources: status history, interview rounds, and the activity log. The component was renamed from StatusHistoryList to ActivityFeed.
The practical argument is simple. A detail screen should tell you what happened with that application. “Note added Tuesday. Moved to Interview Thursday. Tagged as a system design round Friday.” That context is genuinely useful the next time you open the modal and want to remember where you left things.
12 May 2026 — Finishing the Kanban Board
Five things that had been sitting on the list.
Close reason on drag
Dropping a card to the Closed column previously set a default sub-status of N/A with no user input. A withdrawal and a rejection looked identical in the data.
Dropping to Closed now opens a modal with four options: I Withdrew, Not Selected, No Response, Archived. Cancelling reverts the card and no status update fires. Rejection options chain to the same feedback capture step as the detail-screen Close Job menu, using the same sub-status values. The two paths are now consistent.
The dropzone placeholder
Dragging a card into another column showed a ring around the entire column. It was visually heavy and didn’t clearly indicate where the card would land.
The ring is gone. A dashed placeholder card appears inside the column body during a cross-column drag, highlighted when the cursor is directly over that column. Smaller in scope than most things in this list. Noticeably better than what it replaced.
Interview pill with round context
The “Upcoming” pill on Interview-stage cards now shows which round and what type it is: “Round 2 · Technical Interview · Video Call: 16 May” rather than “Upcoming: 16 May”. The data was already there from Story 2-10. This was a display change only, built by parsing the interview_rounds_json field that was already on the application model.
Fixing the double-modal problem
Moving a card back into the Interview column when rounds already existed was opening the event date modal and would have created a duplicate round on confirmation. The fix checks whether rounds exist for the application before deciding whether to show the modal. If they do, the status updates directly. New rounds are added deliberately through the Event Dates section.
13 May 2026 — The Stepper Reads as Progress
A small visual change that makes the status stepper feel like it belongs.
Previously all four stage buttons looked identical regardless of how far through the pipeline an application was. Applied stage and Interview stage were visually indistinguishable except for the single highlighted current step. Past progress was invisible.
The fix: a CSS ::after chevron arrow connecting each stage to the next, and data-filled state tracking that colours every completed stage in the primary colour, leaving future stages muted. Three lines of CSS and a boolean attribute. The stepper now reads as a breadcrumb of progress rather than a row of tabs.
Where Things Stand
Epic 2 is complete. All ten stories done.
The full tracking core exists: add applications, track status history, capture event dates and times, record interview rounds with types and formats, view as a table or a Kanban board, filter, sort, drag to advance, import from a spreadsheet. The detail modal has been rethought from the ground up. An application now has a proper story: what happened, when it happened, what kind of interviews you sat, what notes you left along the way.
Epic 3 is next: CV profile management. Save your CV in the app, keep it updated, eventually manage multiple versions. That is the foundation the AI cover letter generator needs before it can do anything useful.
Why I think this is worth sharing
I’m not writing this as a tutorial. I don’t have the expertise to teach React or database design.
I’m writing it because I think there’s a version of this story that a lot of people in design and front-end can relate to: knowing exactly what you want to build, being able to articulate it clearly, having good taste and real product instincts, and being blocked by a layer of technical complexity that’s just out of reach.
AI-assisted coding is changing that. Not by making everyone a senior engineer, but by making it possible to move further with the skills you already have.
This project is my test of how far that goes. Epic 2 done, four to go.
Appply is being built in public. The stack is Next.js 15, Cloudflare Workers, D1, Workers AI. The planning methodology is BMad.